Raytracing in Vulkan using C# — Part 4
In this part we will add triangles, asset importing and we will create our scenes in C# code which we than can submit to the shader via storage buffers.
Triangles
We will now add triangles to our raytracer. In 3D graphics triangles are the building blocks of all visible meshes — so adding triangles adds the possibility to add all kinds of meshes. A triangle is build of 6 vec3 fields. 3 for the vertex positions, 3 for the triangles normals. We will also add a bool field to indicate whether we have precalculated normales or not.
struct triangle {
vec3 v0
vec3 v1
vec3 v2
vec3 n0
vec3 n1
vec3 n2
bool precalculatedNormals
}
Now let’s add a cube to our scene, which uses the triangle information from the (german) Wikipedia article about obj-Files.
triangle triangles[12];
vec3 v0 = vec3(1, -1, -1);
vec3 v1 = vec3(1, -1, 1);
vec3 v2 = vec3(-1, -1, 1);
vec3 v3 = vec3(-1, -1, -1);
vec3 v4 = vec3(1, 1, -1);
vec3 v5 = vec3(1, 1, 1);
vec3 v6 = vec3(-1, 1, 1);
vec3 v7 = vec3(-1, 1, -1);
triangles[0] = triangle(v1, v2, v3, vec3(0), vec3(0), vec3(0), false);
triangles[1] = triangle(v7, v6, v5, vec3(0), vec3(0), vec3(0), false);
triangles[2] = triangle(v0, v4, v5, vec3(0), vec3(0), vec3(0), false);
triangles[3] = triangle(v1, v5, v6, vec3(0), vec3(0), vec3(0), false);
triangles[4] = triangle(v6, v7, v3, vec3(0), vec3(0), vec3(0), false);
triangles[5] = triangle(v0, v3, v7, vec3(0), vec3(0), vec3(0), false);
triangles[6] = triangle(v0, v1, v3, vec3(0), vec3(0), vec3(0), false);
triangles[7] = triangle(v4, v7, v5, vec3(0), vec3(0), vec3(0), false);
triangles[8] = triangle(v1, v0, v5, vec3(0), vec3(0), vec3(0), false);
triangles[9] = triangle(v2, v1, v6, vec3(0), vec3(0), vec3(0), false);
triangles[10] = triangle(v2, v6, v3, vec3(0), vec3(0), vec3(0), false);
triangles[11] = triangle(v4, v0, v7, vec3(0), vec3(0), vec3(0), false);
We now want to see those added triangles. We will use the Möller-Trombore-Algorithm as described on scratchapixel.com— a very good site to get into the math-side of rendering.
bool hitTriangle(triangle tri, ray ray, inout payload payload) {
    vec3 v0v1 = tri.v1 - tri.v0;
    vec3 v0v2 = tri.v2 - tri.v0;
    vec3 pVec = cross(ray.direction, v0v2);
    float det = dot(v0v1, pVec);

    if(abs(det) < epsilon) return false;

    float invDet = 1 / det;
    vec3 tVec = ray.origin - tri.v0;
    float u = dot(tVec, pVec) * invDet;
    vec3 qVec = cross(tVec, v0v1);
    float v = dot(ray.direction, qVec) * invDet;

    if(u < 0.0 || v < 0.0 || (u + v) > 1.0) return false;

    float t = dot(v0v2, qVec) * invDet;
    if (t <= 0.001) return false;

    payload.hitDistance = t;
    payload.hitPoint = ray.origin + t * ray.direction;
    payload.normal = vec3(u,v,1-u-v);
    if (!tri.precalculatedNormals)
        payload.normal = normalize(cross(v0v2, v0v1));
    else
        payload.normal = tri.n1 * u + tri.n2 * v + tri.n0 * (1 - u - v);

    if(det < 0)
        payload.normal *= -1;

    return true;
}
We now have to copy and paste the spheres-loop in PerPixel and rename all sphere occurences to triangle.
for(int i = 0; i < triangles.length(); i++)
{
    if (hitTriangle(triangles[i], ray, localPayload))
    {
        hit = true;
        if (localPayload.hitDistance < closestT)
        {
            closestT = localPayload.hitDistance;
            payload = localPayload;
        }
    }
}
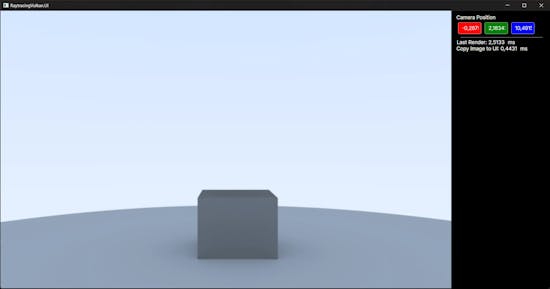
And now we can see our cube sticking in our ground sphere.
Asset import
Adding vertices by hand is not the most optimal way to add objects to our scene — escpecially if we want to render bigger objects like suzanne the blender monkey.
What we want is to set our scene up in the C# code and push everything to our shader. We will use a storage buffer for this task. This part of the C#/Vulkan interoperation always ends in a lot of debugging pain, as the alignment of the structs has to be right.
Me when i need to debug shaders - colorized:
We add the storage buffer to our shader on binding 3. Note that we use vec4 now to have one float of padding. We need to add to add .xyz to every vector used in our HitTriangles-function. The padding is needed as std140 expects blocks consisting of 16 bytes which is the size of vec4. We could also add float fields between each former vec3 so we would not have to update our hit function.
struct triangle {
vec4 v0;
vec4 v1;
vec4 v2;
vec4 n0;
vec4 n1;
vec4 n2;
bool precalculatedNormals;
};
layout(binding = 3, std140) readonly buffer Triangles{
triangle triangles[];
};
Let’s add a struct with the same layout in our C# codebase. We will explicitly specify the data alignment in our struct so we can be sure the data fits what the shader expects.
[StructLayout(LayoutKind.Explicit, Size = 112)]

public struct Triangle
{
    [FieldOffset(0)] public Vector3 V0;
    [FieldOffset(16)] public Vector3 V1;
    [FieldOffset(32)] public Vector3 V2;

    [FieldOffset(48)] public Vector3 N0;
    [FieldOffset(64)] public Vector3 N1;
    [FieldOffset(80)] public Vector3 N2;

    [FieldOffset(96)] public bool HasNormals;

    public Triangle(Vector3 v0, Vector3 v1, Vector3 v2, Vector3 n0, Vector3 n1, Vector3 n2)
    {
        V0 = v0;
        V1 = v1;
        V2 = v2;
        N0 = n0;
        N1 = n1;
        N2 = n2;
        HasNormals = true;
    }

    public Triangle(Vector3 v0, Vector3 v1, Vector3 v2)
    {
        V0 = v0;
        V1 = v1;
        V2 = v2;
        N0 = N1 = N2 = Vector3.Zero;
        HasNormals = false;
    }
}
We cut and modify our cube generation to our renderer for now. Furthermore we will have to add binding slot 3 to our DescriptorSetLayout and DescriptorPoolSizes, create the buffer and write to it. We will use a HostVisibleBuffer for now but will update it using a staging buffer later.
private static Triangle[] Cube()
{
    var triangles = new Triangle[12];
    var v0 = new Vector3(1.0f, -1.0f, -1.0f);
    var v1 = new Vector3(1.0f, -1.0f, 1.0f);
    var v2 = new Vector3(-1.0f, -1.0f, 1.0f);
    var v3 = new Vector3(-1.0f, -1.0f, -1.0f);
    var v4 = new Vector3(1.0f, 1.0f, -1.0f);
    var v5 = new Vector3(1.0f, 1.0f, 1.0f);
    var v6 = new Vector3(-1.0f, 1.0f, 1.0f);
    var v7 = new Vector3(-1.0f, 1.0f, -1.0f);
    triangles[0] = new Triangle(v1, v2, v3);
    triangles[1] = new Triangle(v7, v6, v5);
    triangles[2] = new Triangle(v0, v4, v5);
    triangles[3] = new Triangle(v1, v5, v6);
    triangles[4] = new Triangle(v6, v7, v3);
    triangles[5] = new Triangle(v0, v3, v7);
    triangles[6] = new Triangle(v0, v1, v3);
    triangles[7] = new Triangle(v4, v7, v5);
    triangles[8] = new Triangle(v1, v0, v5);
    triangles[9] = new Triangle(v2, v1, v6);
    triangles[10] = new Triangle(v2, v6, v3);
    triangles[11] = new Triangle(v4, v0, v7);
    return triangles;
}
_triangles = Cube();
var poolSizes = new DescriptorPoolSize[]
{
new() {Type = DescriptorType.StorageImage, DescriptorCount = 1000},
new() {Type = DescriptorType.UniformBuffer, DescriptorCount = 1000},
new() {Type = DescriptorType.StorageBuffer, DescriptorCount = 1000}
};
_descriptorPool = _context.CreateDescriptorPool(poolSizes);
var binding0 = new DescriptorSetLayoutBinding
{
Binding = 0,
DescriptorCount = 1,
DescriptorType = DescriptorType.StorageImage,
StageFlags = ShaderStageFlags.ComputeBit
};
var binding1 = binding0 with {Binding = 1, DescriptorType = DescriptorType.UniformBuffer};
var binding2 = binding0 with {Binding = 2};
var binding3 = binding0 with {Binding = 3, DescriptorType = DescriptorType.StorageBuffer};
_setLayout = _context.CreateDescriptorSetLayout(new[] {binding0, binding1, binding2, binding3});
[...]
_triangleBuffer = new VkBuffer(_context, (uint) (sizeof(Triangle) * _triangles.Length), BufferUsageFlags.StorageBufferBit, MemoryPropertyFlags.HostVisibleBit | MemoryPropertyFlags.DeviceLocalBit);
var pData = IntPtr.Zero.ToPointer();
_triangleBuffer.MapMemory(ref pData);
fixed (void* pTriangles = _triangles)
System.Buffer.MemoryCopy(pTriangles, pData, _triangleBuffer.Size, _triangleBuffer.Size);
_triangleBuffer.UnmapMemory();
_context.UpdateDescriptorSetBuffer(ref _descriptorSet, _triangleBuffer.GetBufferInfo(), DescriptorType.StorageBuffer, 3);
Everything should work now and we should see the same picture as before now!
Now let’s finally import suzanne! Luckily we can use Assimp through the Silk.NET bindings and therefore get away without reinventing the wheel here.
Export Suzanne from Blender
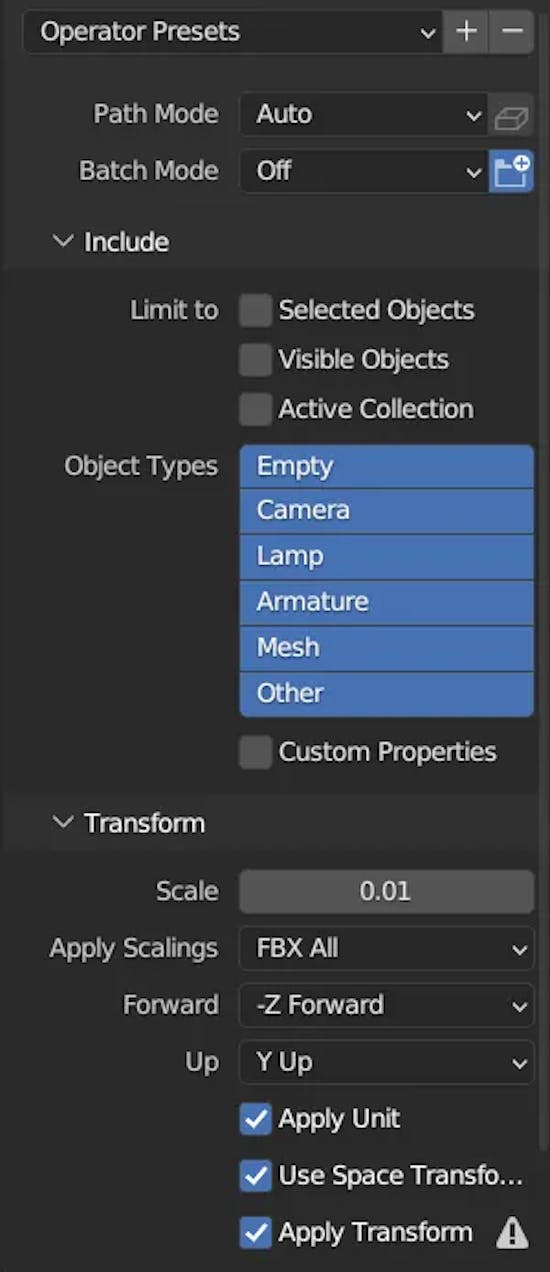
First we add Suzanne to an empty scene and remove all cameras and lights. The we export the scene as .fbx (assimp is capable of handling a lot more formats) with the following settings.
Apply Scalings: FBX All; Forward: -Z Forward; Up: Y Up; Apply Unit, Use Space Transformations, Apply Transform
Import Suzanne using Assimp
Then we create a Vertex struct like we would in a rasterizer.
public struct Vertex
{
    public Vector3 Position;
    public Vector3 Normal;
    public Vector2 TextureCoordinate;

    public Vertex(Vector3 position, Vector3 normal, Vector2 textureCoordinate)
    {
        Position = position;
        Normal = normal;
        TextureCoordinate = textureCoordinate;
    }
}
We also need to create a mesh with vertices and indices which can generate our Triangle data which our raytracer can handle. This code should be pretty straight forward.
public class Mesh
{
    public Vertex[] Vertices;
    public uint[] Indices;

    public Triangle[] ToTriangles()
    {
        var triangles = new List<Triangle>();
        for (var i = 0; i < Indices.Length; i += 3)
        {
            var v0 = Vertices[Indices[i]];
            var v1 = Vertices[Indices[i + 1]];
            var v2 = Vertices[Indices[i + 2]];
            triangles.Add(new Triangle(v0.Position, v1.Position, v2.Position, v0.Normal, v1.Normal, v2.Normal));
        }

        return triangles.ToArray();
    }
}
To use Assimp, which is by far the most versatile library for importing assets into any rendering engine, we will reference its Silk.NET binding in our project.
<PackageReferenceInclude="Silk.NET.Assimp"Version="2.17.1" />
Assimp loads in files which contain specific nodes. We create a static class called MeshImporter which will get a FromFile-method to load in our meshes. As we did in VkContext we also need to store an API object for Assimp here.
private static readonly Assimp Assimp = Assimp.GetApi();
public static Mesh[] FromFile(string filename)
{
    var pScene = Assimp.ImportFile(filename, (uint) PostProcessPreset.TargetRealTimeFast);
    var meshes = VisitNode(pScene->MRootNode, pScene);
    Assimp.ReleaseImport(pScene);
    return meshes.ToArray();
}
Let’s create the VisitNode Method. This will load all meshes of the current node and will recursively call itself for each child node. We will add all meshes to a list which will be generated by a VisitMesh method.
private static List<Mesh> VisitNode(Node* pNode, Scene* pScene)
{
    var meshes = new List<Mesh>();
    for (var m = 0; m < pNode->MNumMeshes; m++)
    {
        var pMesh = pScene->MMeshes[pNode->MMeshes[m]];
        meshes.Add(VisitMesh(pMesh));
    }
    for(var i = 0; i < pNode->MNumChildren; i++) meshes.AddRange(VisitNode(pNode->MChildren[i], pScene));
    return meshes;
}
The VisitMesh method will get each vertex’ position, normal and texture coordinate (which currently is unused in our renderer). It will also use the information about faces to generate our index lists.
private static Mesh VisitMesh(Silk.NET.Assimp.Mesh* pMesh)
{
    var vertices = new List<Vertex>();
    var indices = new List<uint>();
    for (var i = 0; i < pMesh->MNumVertices; i++)
    {
        var vertex = new Vertex
        {
            Position = pMesh->MVertices[i]
        };
        if (pMesh->MNormals != null) vertex.Normal = pMesh->MNormals[i];
        if (pMesh->MTextureCoords[0] != null)
        {
            var pTex3 = pMesh->MTextureCoords[0][i];
            vertex.TextureCoordinate = new Vector2(pTex3.X, pTex3.Y);
        }
        vertices.Add(vertex);
    }

    for (var j = 0; j < pMesh->MNumFaces; j++)
    {
        var face = pMesh->MFaces[j];
        for (uint i = 0; i < face.MNumIndices; i++) indices.Add(face.MIndices[i]);
    }

    return new Mesh {Vertices = vertices.ToArray(), Indices = indices.ToArray()};
}
We can now replace the call to the Cube method in our renderer with loading Suzanne.
_triangles = MeshImporter.FromFile("./assets/models/suzanne.fbx")[0].ToTriangles()
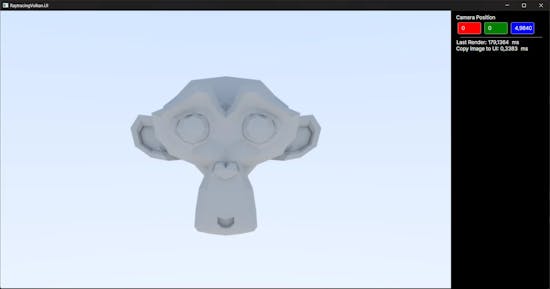
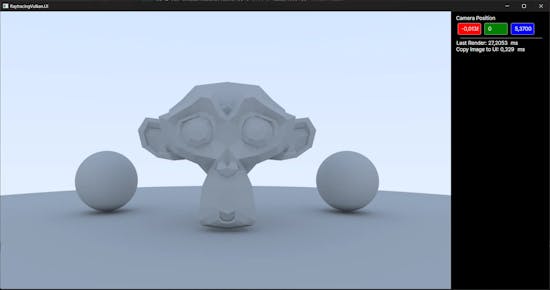
I commented out the sphere part to only see suzanne (just for the image).
Suzanne appears on our screen which is fine, but the render time is rather slow. But remember Suzanne is built from 968 triangles! This would take seconds to minutes on a CPU renderer at this stage.
Small tweaks to reduce render time
Let’s create a CopyToBuffer method in VkBuffer.
public void CopyToBuffer(VkBuffer vkBuffer)
{
var cmd = VkContext.BeginSingleTimeCommands();
var copyRegion = new BufferCopy {Size = Size, SrcOffset = 0, DstOffset = 0};
Vk.CmdCopyBuffer(cmd, Buffer, vkBuffer.Buffer, 1, ©Region);
VkContext.EndSingleTimeCommands(cmd);
}
No we can use a staging buffer to store the triangle data in the faster DeviceLocal memory region which on my system gave a good amount of speedup (~ -50 ms).
_triangleBuffer = new VkBuffer(_context, (uint) (sizeof(Triangle) * _triangles.Length), BufferUsageFlags.StorageBufferBit | BufferUsageFlags.TransferDstBit, MemoryPropertyFlags.DeviceLocalBit);
var stagingBuffer = new VkBuffer(_context, (uint) (sizeof(Triangle) * _triangles.Length), BufferUsageFlags.TransferSrcBit, MemoryPropertyFlags.HostVisibleBit | MemoryPropertyFlags.HostCoherentBit);
var pData = IntPtr.Zero.ToPointer();
stagingBuffer.MapMemory(ref pData);
fixed (void* pTriangles = _triangles)
System.Buffer.MemoryCopy(pTriangles, pData, stagingBuffer.Size, stagingBuffer.Size);
stagingBuffer.UnmapMemory();
stagingBuffer.CopyToBuffer(_triangleBuffer);
To reduce the render time even further we will do only one anti aliasing sample per frame as we are accumulating samples anyway. So let’s remove the loop here.
We will also implement the tmin/tmax calculations from the RTioW-series. We can get the cameras near and far plane with
float near = sceneData.camProj[3][2] / sceneData.camProj[2][2];
float far = sceneData.camProj[3][2] / (sceneData.camProj[2][2] + 1);
We will initialize closestT with far and pass near and closestT into both of the hit functions. We do not need the check is hitDistance is closest anymore.
float closestT = far;
for(int i = 0; i < spheres.length(); i++)
{
    if (hitSphere(spheres[i], ray, near, closestT, localPayload))
    {
        hit = true;
        closestT = localPayload.hitDistance;
        payload = localPayload;
    }
}
for(int i = 0; i < triangles.length(); i++)
{
    if (hitTriangle(triangles[i], ray, near, closestT, localPayload))
    {
        hit = true;
        closestT = localPayload.hitDistance;
        payload = localPayload;
    }
}
In the HitSphere function we will check the value of t right after calculation.
if (discriminant < 0) return false;

float sqD = sqrt(discriminant);
//calculate hitpoint and normal
float t = (-b - sqD) / (2.0 * a);
if (t < tmin || tmax < t)
{
    t = (-b + sqD) / (2.0 * a);
    if(t < tmin || tmax < t) return false;
}
We will do this in HitTriangle accordingly:
float t = dot(v0v2, qVec) * invDet
if(t < tmin || tmax < t) return false
Sphere Buffer
Let’s add another buffer on binding 4! Like with the triangles we will create a storage buffer for our sphere objects. This is how our sphere struct looks like:
[StructLayout(LayoutKind.Explicit)]
public struct Sphere
{
    [FieldOffset(0)] public Vector3 Position;
    [FieldOffset(12)] public float Radius;
}
The sphere buffer implementation is identical to the triangle buffer (If unsure look at the repository). We will fill the scene with 3 spheres:
_spheres = new Sphere[]
{
    new() {Position = new Vector3(-2.0f, -0.5f, -1.0f), Radius = 0.5f},
    new() {Position = new Vector3(2.0f, -0.5f, -1.0f), Radius = 0.5f},
    new() {Position = new Vector3(0.0f, -101f, -1.0f), Radius = 100.0f}
};
The rendered scene will look like this
Fences
We will use fences instead of waiting for the queue beeing idle as we can split up our rendering process. First we add a parameter of type Fence to EndCommandBuffer which defaults to “default” and assign it to the SubmitMainQueue call
public void EndCommandBuffer(CommandBuffer cmd, Fence fence = default)
{
    _vk.EndCommandBuffer(cmd);
    var submitInfo = new SubmitInfo
    {
        SType = StructureType.SubmitInfo,
        CommandBufferCount = 1,
        PCommandBuffers = &cmd
    };
    SubmitMainQueue(submitInfo, fence);
}
Than we create all methods we need for our fences:
public Fence CreateFence(FenceCreateFlags flags = FenceCreateFlags.None)
{
    var createInfo = new FenceCreateInfo
    {
        SType = StructureType.FenceCreateInfo,
        Flags = flags
    };
    _vk.CreateFence(Device, createInfo, null, out var fence);
    return fence;
}

public void DestroyFence(Fence fence) => _vk.DestroyFence(Device, fence, null);
public void WaitForFence(Fence fence) => _vk.WaitForFences(Device, 1, fence, true, ulong.MaxValue);
public void ResetFence(Fence fence) => _vk.ResetFences(Device, 1, fence);
In our renderer we create two fences, one for the compute process and one for the copy process. We also create another commandbuffer for the copy process.
_computeCmd = _context.AllocateCommandBuffer()
_computeFence = _context.CreateFence(FenceCreateFlags.SignaledBit)
_copyCmd = _context.AllocateCommandBuffer()
_copyFence = _context.CreateFence()
We now split the main rendering method into two parts. PrepareImage and RenderImage.
private void RenderImage()
{
_context.WaitForFence(_computeFence);
_context.ResetFence(_computeFence);
_context.BeginCommandBuffer(_computeCmd);
_context.BindComputePipeline(_computeCmd, _pipeline);
_context.BindComputeDescriptorSet(_computeCmd, _descriptorSet, _pipelineLayout);
_context.Dispatch(_computeCmd, _vkImage!.Width/16, _vkImage.Height/16, 1);
_context.EndCommandBuffer(_computeCmd, _computeFence);
}
public void PrepareImage()
{
if (_frameIndex == 1) return;
_context.BeginCommandBuffer(_copyCmd);
_vkImage!.TransitionLayout(_copyCmd, ImageLayout.TransferSrcOptimal);
_vkImage.CopyToBuffer(_copyCmd, _vkBuffer!.Buffer);
_vkImage!.TransitionLayout(_copyCmd, ImageLayout.General);
_context.EndCommandBuffer(_copyCmd, _copyFence);
_context.WaitForFence(_copyFence);
_context.ResetFence(_copyFence);
}
public void CopyDataTo(IntPtr address)
{
if (_frameIndex == 1) return;
var size = _viewportWidth * _viewportHeight * 4;
System.Buffer.MemoryCopy(_mappedData, address.ToPointer(), size, size);
}
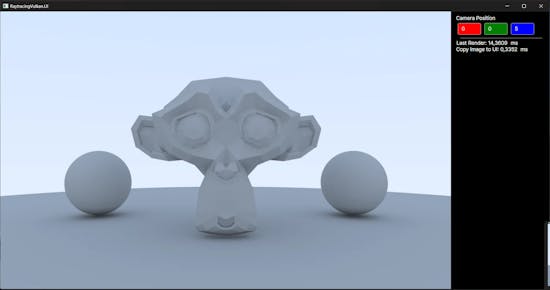
We also change the order in the ViewModel’s RenderMethod to first call PrepareImage and CopyImageToHost and then Dispatch the ComputeShader which uses our GPU and CPU in a more efficient way as the ComputeShader does not have to wait for the image being copied to the UI. We are now below 20 ms frametime!
public void Render()
{
    if (!_renderer.IsReady) return;
    _frameTimeStopWatch.Start();
    _renderer.PrepareImage();
    _ioStopWatch.Start();
    CopyImageToHost();
    _ioStopWatch.Stop();
    HandleInput(FrameTime / 1000f);
    _renderer.Render(ActiveCamera);
    IoTime = (float) _ioStopWatch.Elapsed.TotalMilliseconds;
    _ioStopWatch.Reset();

    _frameTimeStopWatch.Stop();
    FrameTime = (float) _frameTimeStopWatch.Elapsed.TotalMilliseconds;
    _frameTimeStopWatch.Reset();
}
Here is a picture of suzanne and her balls:
Another part comes to an end. The code for part 4 is located here:
JensKrumsieck/raytracing-vulkan at Part-4 (github.com)
A changelog from Part 3 is located here:
Comparing Part-3…Part-4 · JensKrumsieck/raytracing-vulkan (github.com)
Useful Resources:
Originally posted on medium: Raytracing in Vulkan using C# — Part 4 | by Jens Krumsieck | Sep, 2023 | Medium
VulkanC#Compute ShaderRaytracingAvaloniaSilk.NETdevlogProgrammingRenderingPathtracing 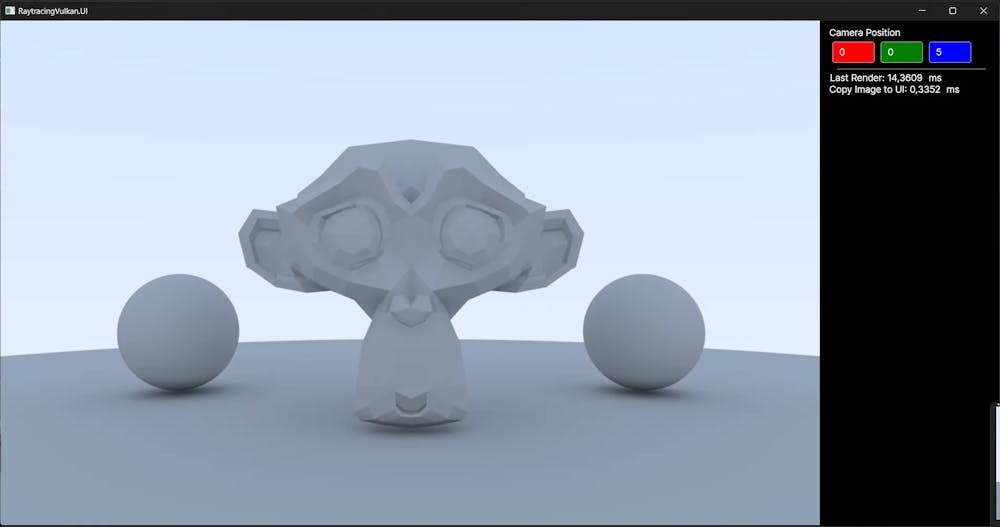

![[object Object]](https://images.prismic.io/jenskrumsieck/65b8f7df615e73009ec41171_PXL_20240126_130333113_.jpg?auto=format%2Ccompress&rect=407%2C0%2C2259%2C2259&w=2666&h=2666)